Newsletter 2013.10 Index
Theme : "Mechanical Engineering Congress, 2013 Japan (MECJ-13)"
| Back | |
EFD Workshop: Measurements of Fluid Force and Shear Stress
Takatsugu KAMEDA |
Abstract
Wall shear stress measurement was introduced in EFD workshop titled “Measurements of Fluid Force and Shear Stress”. There are some methods to measure the wall shear stress: Direct method, wall similarity method and momentum method. In this paper, the direct method was described about the principle and the measurement example.
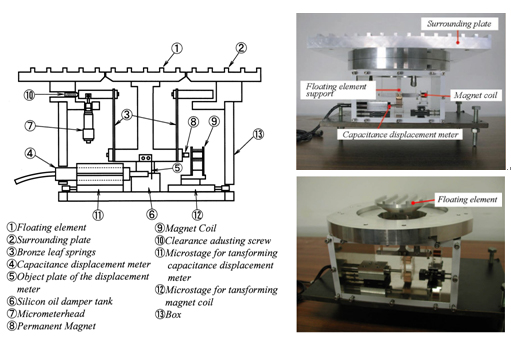
Figure 1 shows a cross section view and photos of the direct measurement device with a floating element. The floating element is supported with a parallel link mechanism through two spring leaves to avoid effect of a moment due to fluid force (sum of secondary force and wall shear force) acting on itself. The gap g is the distance between the floating element and a surrounding plate, and it is required that the non-dimensional value g+ (= guτ/ν, uτ is the friction velocity and ν is the kinematic viscosity.) is less than 10 in order to attenuate a secondary force that occurs in the gap (1). The misalignment h is the difference in height between the floating element and the surrounding plate. When the misalignment size is within -10 to 0 μm, it has been reported that the misalignment has little effect to the fluid force acting on the floating element (2). Also, the difference ΔP between container pressure in the direct measurement device and static pressure within wall-bounded shear flow is an important factor to measure the wall shear stress. Our research group investigated the relation between the ratio of the secondary force Fs to the fluid force Ff and the pressure difference (3). It has been reported that the ratio Fs/Ff is within a few percent as the non-dimensional pressure difference is ΔP/τw = O(1) and the non-dimensional floating element diameter is D+ (= Duτ/ν, D is the floating element diameter.) ≥ 1000. By selecting these parameters adequately, it is able to measure the wall shear force with the direct measurement device.

Fig. 1 Direct measurement device with a floating element
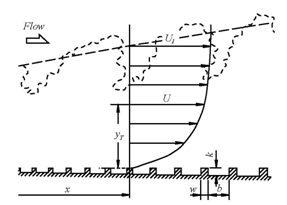
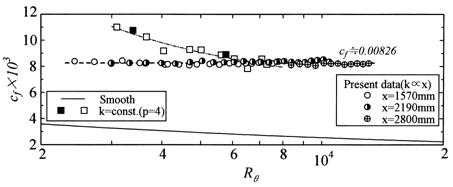
Next, the measurement example is explained for the turbulent boundary layer developing over a rough surface under zero pressure gradient. Figure 2 shows the flow field, coordinate system and nomenclature. The coordinate system is chosen as the streamwise distance x from the leading edge of the rough surface and the vertical distance yT from the top of the roughness element. The roughness height k is proportional to the streamwise distance with dk/dx = 0.00125. The cavity width b between the roughness elements has a size of b = 3k and the roughness width w is 2w = k. The direct measurement device has the gap size of 100 μm. The five roughness elements are placed on the floating element. To measure the wall shear force at three streamwise positions (x = 1570, 2180 and 2800 mm), the diameter of the floating element is 59.1, 77.4 and 89.5 mm at each streamwise position. In order to eliminate ununiformity of the gap, the present device is equipped with a zero displacement mechanism. The mechanism is realized with a permanent magnet and hand-made magnet coil. The calibration curve has good linearity between the tangential force and the current applied to the magnet coil. Figure 3 shows the local skin friction coefficient cf (= F/(1/2・ρU12A), F is the fluid force acting on the floating element, ρ is the fluid density, U1 is the free stream velocity and A is the area of the floating element.) with respect to the momentum thickness Reynolds number Rθ (= θU1/ν, θ is momentum thickness.) The data of the turbulent boundary layers over k-type rough and smooth surfaces (2, 4) are included in Fig. 3. The empty square symbols were estimated with the velocity fit method proposed by Krogstad et al. (5). The data of the present rough surface flow is independent of both the streamwise distance and the momentum thickness Reynolds number, and is constant of 0.00826. Then, the friction parameter ω (= uτ/U1) is maintained constant, so that this satisfies dω/dx = 0, which is one of the conditions for the equilibrium boundary layers. On the other hand, the data of the k-type rough and smooth surface flows decrease with the momentum thickness Reynolds number and he relative roughness height k/δ (δ is the boundary layer thickness.).

Fig. 2 Flow field, coordinate system and nomenclature

Fig. 3 Local skin friction coefficient
Key words
Wall Shear Force, Direct Measurement, Turbulent Boundary Layer
References
| (1) | Gaudet, L. and Winter, K.G., “Measurements of the Drag of Some Characteristic Aircraft Excrescences Immersed in Turbulent Boundary Layers”, AGARD CP124 (1973). |
| (2) | Osaka, H., Kameda, T., and Mochizuki, S., “Local Skin Friction Coefficient Evaluated by Direct Measurement Method and Mean Flow Quantities in a Turbulent Boundary Layer”, Transactions of the Japan Society of Mechanical Engineers Series B, Vol. 62, No. 598 (1996), pp. 2230-2237. |
| (3) | Oota, K., “Experimental Study on Mean Flow Quantities for Turbulent Boundary Layer under an Adverse Pressure Gradient”, Master thesis, Graduate of Science and Engineering, Yamaguchi University (2006). |
| (4) | Osaka, H., Kameda, T., and Mochizuki, S., “Mean Flow Quantities for the Turbulent Boundary Layer over a k-Type Rough Wall”, Transactions of the Japan Society of Mechanical Engineers Series B, Vol. 64, No. 619 (1998), pp. 709-716. |
| (5) | Krogstad, P.-å., Antonia, R.A., and Browne, L.W.B., “Comparison between Rough- and Smooth-Wall Turbulent Boundary Layers”, Journal of Fluid Mechanics, Vol. 245 (1992), pp. 599-617. |


